The Water Damage Mitigation Process in Northwest Indiana
A pipe lets go in a Valparaiso crawl space, or lake-effect rain finds a way into a Hammond basement. Either way, the water is spreading while you read this. Knowing the water damage mitigation process ahead of time saves Northwest Indiana homeowners real money and real stress. This guide walks through each step, what it protects, and where your insurance claim fits in.
Key Takeaways
- Mitigation is the emergency phase: stop the spread, extract the water, and dry the structure fast.
- The first 24 to 48 hours decide whether you face a drying job or a mold problem.
- Document everything before anything is removed, because your insurance claim depends on that evidence.
Why the First 48 Hours Decide Everything
Water keeps doing damage long after the leak stops. It wicks up drywall, soaks subfloors, and settles into wall cavities you cannot see. Per the EPA's guidance on mold and moisture, wet materials dried within 24 to 48 hours usually will not grow mold. Miss that window and you are no longer paying for drying. You are paying for mold remediation and tear-out on top of it.
Northwest Indiana adds its own pressure. Humid summers slow natural drying, and basements across Lake and Porter County sit low and stay damp. The clock here is not a sales tactic. It is chemistry.
The Five Steps of Professional Water Mitigation
Professional mitigation follows a consistent sequence, and reputable crews work to the IICRC S500 standard for water damage restoration. Here is what each step looks like in practice.
Step 1: Inspection and Assessment
Technicians map how far the water actually traveled, not just where it pooled. Moisture meters and thermal imaging find the wet boundary inside walls and under floors. The water is also classified by contamination level, from clean supply-line water to Category 3 sewage.
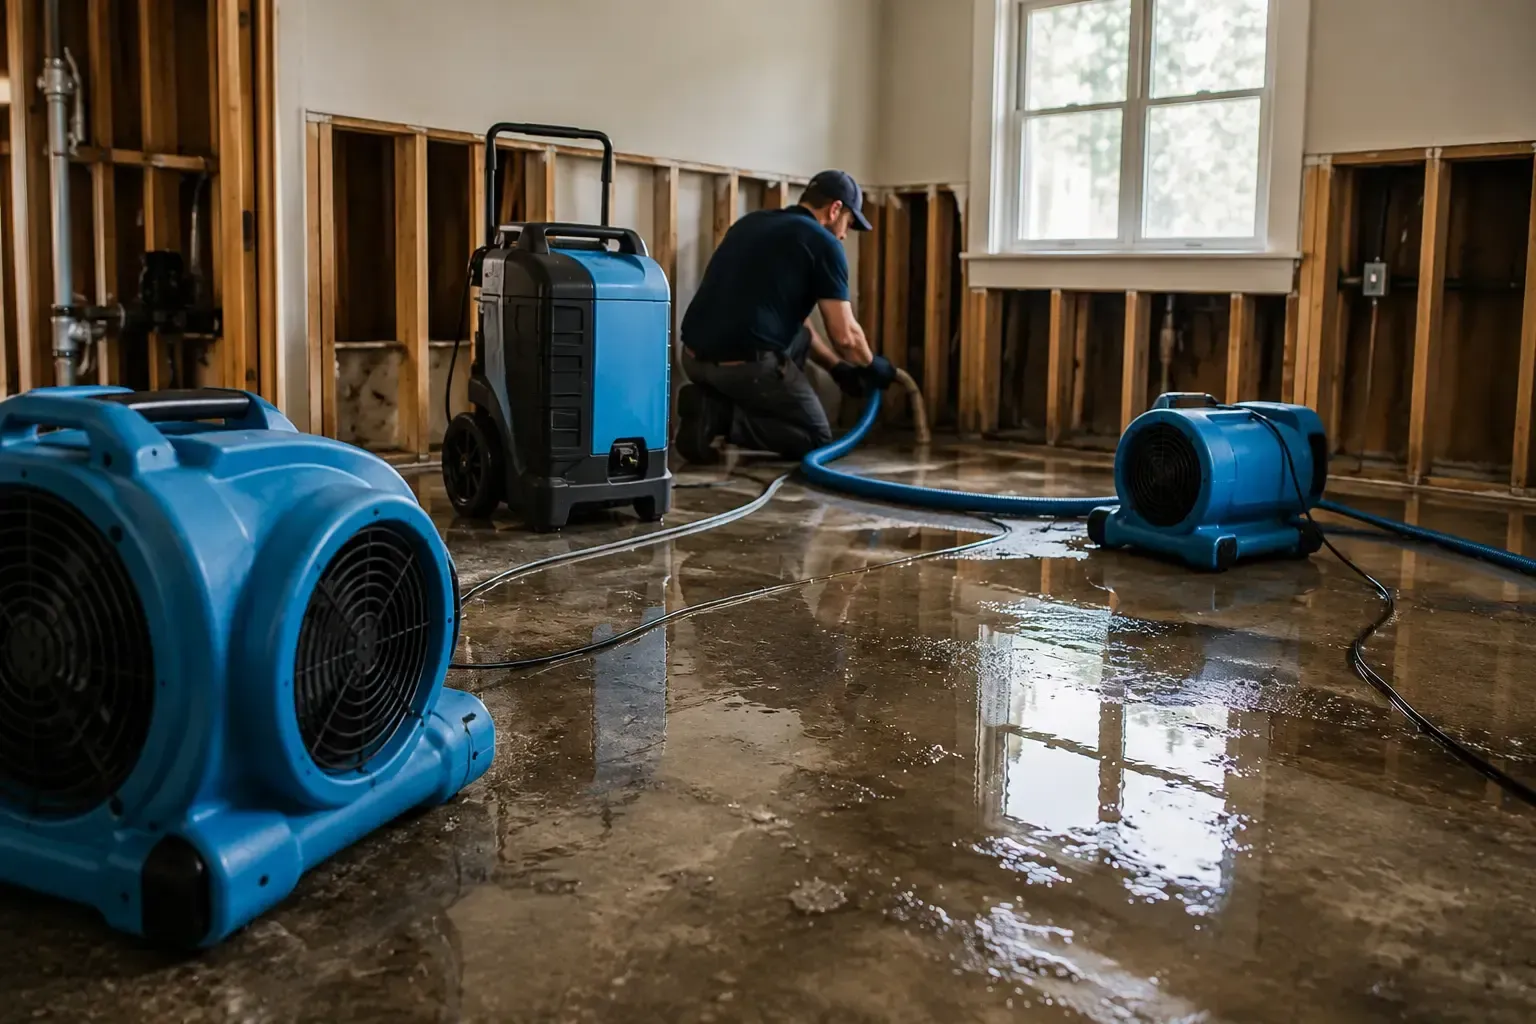
Step 2: Water Extraction
High-powered pumps and truck-mounted vacuums pull out the standing water first. Fast extraction matters more than any other single step. Every gallon removed now is hours of drying saved later.
Step 3: Drying and Dehumidification
Air movers and low-grain refrigerant dehumidifiers force moisture out of the structure itself. This phase runs for days, and crews should return to take moisture readings until materials hit dry-standard numbers. Drying is finished when the meter says so, not when the carpet feels dry.
Step 4: Cleaning and Sanitizing
Anything touched by gray water or sewage gets disinfected or removed. Antimicrobial treatments knock down the bacteria and spores the water carried in. This step protects your family, not just your finishes.
Step 5: Restoration and Rebuild
Unsalvageable drywall, flooring, and insulation come out, and the rebuild puts your home back together. Mitigation and restoration are often quoted separately on your claim. Knowing where one ends and the other begins keeps your settlement honest.
Mitigation vs. Restoration: Two Different Line Items
These words get used interchangeably, and that costs homeowners money. Mitigation is the emergency work: extraction, drying, and stopping further loss. Restoration is the rebuild that follows: new drywall, flooring, paint, and trim. Your insurance claim usually treats them as separate scopes with separate invoices.
Why does that matter? Because a settlement can fully fund the mitigation and quietly shortchange the rebuild. When you review an offer, check both halves against independent estimates. A dried-out house with an underfunded rebuild is still an unfinished claim.
The Documentation Step Most Homeowners Miss
Here is the part the restoration trucks rarely mention. Everything that gets torn out, dried, or hauled away is evidence for your insurance claim. Photograph and video every room, every reading, and every damaged item before work begins. Keep the source of the loss intact if it is safe to do so.
As public adjusters, we see underpaid water claims constantly, and missing documentation is the most common reason. Our mitigation services are built around protecting the claim while we protect the house. The work gets done, and the evidence your settlement depends on gets preserved.
Can You Handle Mitigation Yourself?
For a small, clean-water spill caught immediately, yes. Shut off the source, photograph the damage, and extract with a wet/dry shop vacuum. Pull soaked rugs, run fans and a dehumidifier, and verify with a moisture meter.
Call professionals when any of these are true. The water sat for more than a day. It touched walls, subfloor, or ceiling cavities. It came from a sewer backup or outdoor flooding. Or the loss is big enough that an insurance claim is coming. DIY tear-out before an adjuster inspection can genuinely hurt your payout.
Water Damage Mitigation FAQs for Northwest Indiana
What are the steps of water damage mitigation?
Inspection and assessment, extraction, drying and dehumidification, cleaning and sanitizing, then restoration. Professionals work to the IICRC S500 standard and verify drying with moisture readings.
How fast does mold grow after water damage?
Mold can start within 24 to 48 hours if moisture goes unchecked. Drying or removing wet materials inside that window prevents growth in most cases.
Does mold always grow after a leak?
No. Growth depends on how fast the area dries and whether hidden moisture stays trapped in walls or under floors. Quick, verified drying is the difference.
Will insurance pay for water mitigation?
Sudden, accidental water losses are commonly covered, though every policy has exclusions. Document everything before cleanup and review your settlement carefully before accepting it.
Can I do my own water mitigation?
Only for small, clean spills you catch immediately. Sewage, hidden moisture, or any loss headed for an insurance claim belongs with professionals.
Get the Damage Documented Before It Disappears
The water will be gone in a week, but your claim lives or dies on what was recorded while it was there. U.S. Public Adjusters handles mitigation services across Northwest Indiana with the claim in mind from hour one. If the loss has already happened, our public adjusting services make sure the settlement matches the damage. Reach out before the tear-out starts.
Recent Posts